A Weary World Rejoices Christmas Sign

Hi!  Today I am going to show you how to make a Christmas sign using only paint, plywood and your computer printer so join me will you?  

So, it’s just a couple of weeks before Christmas and I wanted to get in just one more sign.  If there is anybody out there that knows me, they know that I always just want to paint “one more sign” before the holidays.  I was able to score this 2-foot by 2-foot piece of luan plywood at my local Lowe’s.  It was already cut to this size so I didn’t have to mess with that at all.  

I printed out my words from my computer in the font that I like.  For this project, I chose Magnolia Sky.  You can see by the picture that I made the font pretty big.  I had to try printing out my letters a couple of times to get the font size just right.  I feel that the words I have chosen pretty much describes this year.  “The Weary World Rejoices” is from “Joy to the World,” a hymn I have always loved.  

You might have to play with that a little bit.  I had to cut and paste little pieces here and there because it did not fit on all my sheets of paper.  I taped my letters together trying to center as best as I could.  My letters wound up measuring 22 inches by 22 inches.  Knowing that my luan board was 24 inched by 24 inches, I figured this would give me the best design I was looking for.   

What I am going to do first, is paint my sign with an acrylic white paint.  I am using “Top Notch” acrylic paint from Michael’s.  I am holding the bottle upside down in the video.  I didn’t realize it until I was almost finished recording.  I think God is teaching me to laugh at my mistakes because He knows what a crazy perfectionist I am! Ha!  It is very inexpensive and a really good quality acrylic.  I am using a matte white because it is so much easier to transfer your design if it is not a shiny surface.  Cover the entire surface of your luan board with the paint. 

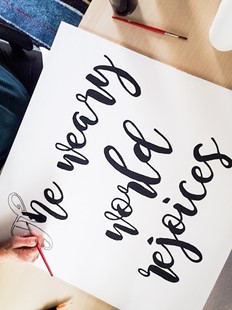
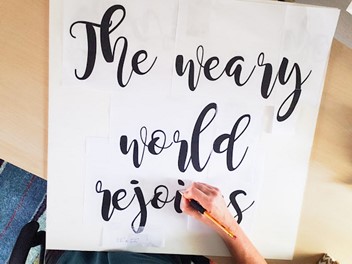
Okay, now while your paint is drying, start making your, as I like to call it, “poor-man’s carbon paper.”  I learned this technique many years ago when I was taking art classes.  Carbon paper was out of a “starving artist’s” price range and so this method was discovered to be an economical solution to transfer an object onto your page.  

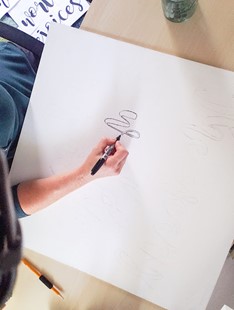
Hold your taped-together words up to the window with the back of the paper facing you.  Loosely draw around every word you see through the paper.  

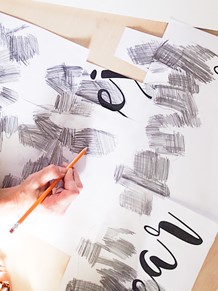
Place your paper on the table with the markings you just made facing you.  Now, scribble in all the words you drew around making sure to fill it in completely.  I love this part because “staying within the lines” in kindergarten was not something I was ever good at!  😉  I use many pencils and then sharpen them all at once instead of using just one pencil and repeatedly stopping to sharpen it.  It will take quite a few pencils to complete.  It’s surprising how fast a pencil lead will dwindle during this project. 

Once you have the back of your letters completely covered with the “carbon” from your lead pencil, turn your paper over and center it on your luan board.  Tape down two of the edges of your paper to the board.  If you only tape one side, the paper can shift causing your transfer to by different than what’s on your paper (i.e. words to be slightly out of place or blurred lines).  I like to lift the corners of the paper periodically to make sure I am using the correct pressure to transfer the words completely on the board.  So, taping down two sides will make sure my design stays put.  Also be careful not to lean or put pressure on your board in areas other than your design.  Thankfully, if you do this by mistake, all is not lost.  A regular pencil eraser should do the trick in removing any unwanted markings on your board.  The beauty of using acrylic paint instead of oil paint or house paint. 

Trace around all your letters periodically checking to see if you are applying enough pressure to transfer the design to your board.  

Secret tip:  If you are planning to paint your sign with black paint, trace around each letter with a black Sharpie™ marker.  This will make it so much easier to paint the letters and will help you to keep your lines crisp.  Also, if you choose a font with ultra-thin lines, the marker might be a better option than a paint brush (depending on your skill level).


This project cost me roughly 4 dollars to make (because I already had the paint and the brushes).  I am planning to put picture hanger hardware on the back, but you could frame your sign if you choose.  The options are endless!  Please send me a pic of your finished sign!  I would love to see what you came up with! 

Hi, I’m Danielle!

I am the designer, writer and diy’er behind this blog. I enjoy decorating my home for practically nothing by doing most of the work myself, finding new and imaginative ways to make it beautiful and by watching for killer sales. I find humor almost anywhere and can laugh at myself through it all. I have learned that most projects don’t go exactly as intended, but can be more beautiful than the original plan.

Re-Fabbed Boutique – Beautiful, quality clothing for women of all shapes and sizes!!